
The fact that I've been stuck on this problem myself was reason enough to, after succeeding, to create a tutorial for others who might attempt to do the same thing, namely, switching animations from one model, to the other. As long as you follow the steps, not much can go wrong, and of course, you are always encouraged to add more steps of your own to get the desired result!
I know this is a quite long tutorial, but it will teach you to work with different programs, and applying different techniques which might be useful for other stuff you may run into during modding for the Source engine! Good luck, and as always, comments, tips and any other feedback are always welcome! For this tutorial, I will be switching the Fast Zombie's animations to one of the Citizen's model.
Required Software
- A legit copy of any Source game
- Source SDK
- VTF Edit
- 3DS Max / XSI Mod tool (not in all cases, it was necessary in mine tough)
- GCFScape
- Notepad++ in combination with the Notepad++ VDF languages (not necessary, but proves to be really usefull!)
- Cannonfodder's MDL Decompiler
Here's a quick overview on what we are going to do:
- Extracting the needed models from the right .GCF file
- Decompiling the extracted models
- Combining the needed files in the same folder
- Rewriting the .QC file to fit our needs and compiling the model
- Fixing the face texture error
- Fixing the hand error
Step 1 - Extracting the needed models from the right .GCF file
Once you have installed all the necessary tools, open up the .GCF which contains the models you will need. The .GCF's are located in ..\Steam\steamapps\ . The one I need is source models.gcf

Open it up with GCFScape and browse to root\hl2\models\Humans\Group01\ . I chose the male07, because I like the model. Select all the male07 files and drag them to an empty folder in which you will work on the model, it doesn't really care where you place it, as long as it's easy to find.

Now select the second model you will need, same procedure, but place them in another empty folder, to keep the decompiled files apart from each other later on.

Step 2 - Decompiling the extracted models
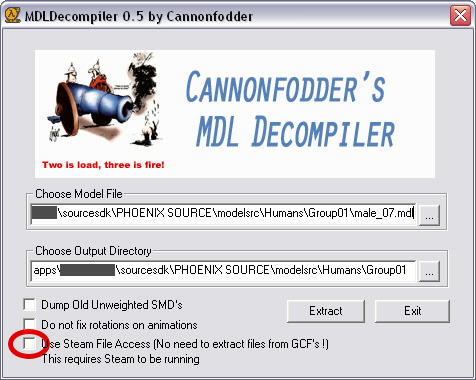
After extracting the models to some fresh, empty folders, load up Cannonfodder's MDL Decompiler and select the first model for decompilation. Don't forget to set the Output folder to the same folder (or a new one) as your Source .mdl! Also uncheck the Steam File Access option, as it will most likely crash Cannonfodder on decompiling.
Repeat the same process for the other model
Step 3 - Combining the needed files in the same folder
After decompilation, you will be left with the following files for the Male07 model and the FastZombie model


As you might have noticed, the FastZombie model decompiles to a LOT more files, this is because all the animation .SMD's are combined in the FastZombie's model, while the Citizen's are in a separate file, so they can be used by all the other variations of the Citizen's model
We will need all the FastZombie's animation files, so select them and copy them into a new folder (I named mine Mutants, because I aim to create a mutant like npc).
The .SMD files you will need are almost all, except for the ragdoll, phymodel, reference, unkownmodel and lod .SMD files
From the Citizen you will need the ragdoll, phymodel, reference and lod .SMD files. You will also need the Citizen's mdldecompiler.qc, as we will use this as a base for our new model.
After placing all the needed files in a separate folder you will have something like this

Step 4 - Rewriting the .QC file to fit our needs and compiling the model
I renamed all the reference files from ...citizen... to ...mutant_humanmale... to make it more recognizable and understandable for the npc I'm trying to create. It might be wise for you too to rename your models.
Now open up the mdldecompiler.qc with notepad, or in my case with Notepad++. It will show up like this

As you can see, in Notepad++ every important piece of code is highlighted, so you will notice it much faster than in regular notepad! It also has the abilty to collapse certain controllers, which as you can see here, with the facial animation system saves me 180 lines of code to scroll through!
Next we will modify the lines to suit our needs, we'll start with the first $cd line. This line is needed for our model compiler to know in which directory it should start to work. But as long as all the files are in the same directory, you can delete this line. This makes moving the files around a lot easier, since you don't have to edit the .QC file evry them you move them then.
Next up is the $modelname string, this one will determine what the name of your model will be, and what it's path will be in your mod's model folder. Set it up the way you want, similair to this, remember that it will start in the "model" map of the mod/game you compile this model for!
The next line to edit is the one which will tell the compiler the name of our model (not extremely important) and the reference file of it (the way it looks). You see after that you will have to open a curly bracket (in some cases), after this bracket the facial animation system is declared, this might not apply for your model. I changed the name of my model to "mutant_humanmale" and the used model to the corresponding "mutant_humanmale_reference.smd".
Next up are the LOD definitions, these tell the compiler, and the engine to replace the base model with a lower detail version at longer distances. The $lod command will contain a $replacemodel command, which tells the compiler which model to replace with what lower detail one. In this case the model to replace will be our reference model, and we want it to be replaced by the corresponding LOD version. Set these up as the following
The next thing to change is the $cdmaterials option, this will tell the compiler where the materials for this model are. Since we're using the Citizen's base .qc file, these should already be set up correctly. If not, set them up like this.
If you would like to reskin your model though, you can change these folders to a custom one, this way you won't have to edit and overwrite the standard skins.
Next up are a lot of options which we don't need to change, but if you're interested in what they mean, they should be very self-explanatory
You will notice there are a few $includemodel options. These will tell the compiler to include all the Citizen's animations from the shared animation model files, we don't need them as we want a mutant, so you can delete these lines.
What we do have to copy from the FastZombie's .qc is all the animation, sequence and ikchain definitions, so look them up in that .qc and copy them into our Mutants .qc. This will tell the compiler to use all the animations. This is an example of the code we will need to copy. The $sequence and $animation strings will tell the compiler what animations to use, and the $ikchain is used for the model to show correctly ingame on sloped surfaces and step, so the legs and knees will bend at an anatomaly correct way.
An alternative way to add the animations is to change the $includemodel lines to add the Zombie/Fast.mdl. This way all the animations will be added without all these lines of code. If you like to keep control of them yourself tough, the above code is the way to go.
That's all we need to change in the .QC, so save and close it for now. Next up is the fun part, let's compile and open up our model! For this we will write a little batch file so we won't have to write these commands in a terminal by hand. It will define the path to the studiomdl.exe which compiles our model, and the .QC file to compile. After that we add the pause command, to let the commandprompt stay open until we tell it to close. Our .BAT file will look like this
Save it as an .BAT and run it! If everything is set up correctly you will see the following screen. Notice that the compiler will compile the model to the game/mod that is currently loaded in Source SDK, so make sure you select the right one, or your models may end up in the wrong game! With Notepad++, in combination with the NppExec plugin, it is also possible to compile your model by just pressing F6... You might want to look into this for fast compiling and testing.

If everything worked out, load up your model in MDLviewer to see the result!
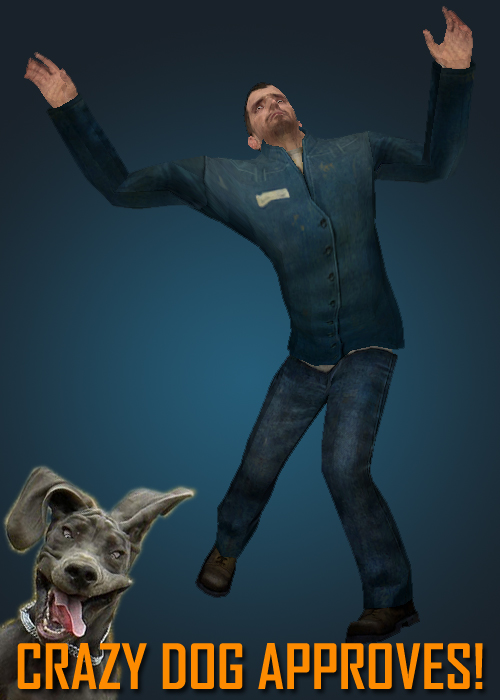
Tadaa! There we have our disco dancing zombie citizen. But wait, it's hands are all stretched up, and it looks as if he stuck his head in a place without sunlight! But no need to worry, we will fix this in the next steps. This is where VTFEdit and 3DS Max kick in.

Step 5 - Fixing the face texture error
Luckily, the problem with the face texture is an easy fix (thanks to Guessmyname here at lopers!), Open up the source materials.gcf and browse to root\hl2\materials\Models\Humans\Male\Group1\ and extract the mike_facemap.vmt and .vtf. If you chose another model than the Male07, you will need other files! Place them in the same folders as in the .GCF in your game/mod directory.
Now open up the mike_facemap.vtf with VTFEdit, and open up the Image tab, you will see the Clamp S and Clamp T functions to be checked, uncheck these and save the texture.

Reload your model in MDLViewer and you will hopefully see a fixed face texture!
Step 6 - Fixing the hand error
We still have the fingery-finger hand issue left, to fix this we will need 3DS Max to reskin the hands to the forearm bones (Thanks again to Guessmyname and some other lopers for this one!). This will tell the compiler and the engine (yes we have to recompile our model, that's why we created an easy to re-use .BAT file) to make the hands animate along with the forearm. This does mean that his hands will stay in an idle position, but ingame you will hardly notice this. Open up 3DS Max and import the mutant_humanmale_reference.smd. For this, you will need the 3DS Max .SMD Import and Export Plugin. During the import, you will recieve a few dialogs, leave the settings for what the are and just continue. In 3DS Max you will now see your Citizen's model appear.

Now go to the Modifier tab and select the Skin > Envelope option. You will now see the selected bone and it's attached, highlighted Skin. The coloring determines the weight of the animations on this bone and it's attached skin.

Select the forearm bone by clicking on it and scroll down in the tool list and select the Paint Weights tool, you might want to uncheck the Paint blend weights option. Now paint the hands to add them to the forearm bone. Repeat the same step for the other hand, but this time with the other forearm bone.

When you're done, export the model to the mutant_humanmale_reference.smd. And recompile your model. Load it up in MDLViewer, and voilà, a zombie citizen without a black head, and no more stretched fingers!
I hope you enjoyed this tutorial and learned something from it. This was a lot of work to do, so if you pulled it off, you should actualy be proud of yourself!


ROFL loved that dogs face xXDD
and thanks for the tut!
lol, great tut :P
cool,got me interested in H2L game making
yea i now can import playermodels from CS:S portal DOD and more skins for CS:S to SMOD XD
Why cannonfoders compiler? WHY?!!?!?
Nice TUT, but I cant get the Fast Zombie animations. It gives me an error when it tries to open the file, something involving cannot open ^B which is some reference to a headcrab.
When I linked the Fast Zombie animations with the $includemodel line, it just crashed HL2.exe every time.
It DID work for other anims though, like metropolice and combine. I went one step further and renamed the model, smd, vvd and phys files from citizen_05 to Police, essentially giving citizens Combine Ai, which is MUCH smarter. (they are reskinned into infected)
Anyone know how to actually get the fast Zombie Anims out of there?
Used this tutorial to give a soldier a metrocops animations so he could use the pistol, it worked! Great tutorial.
plx create video tut
man i have it non-steam
how do i pack the smd files back to a mdl file again? please ansear
This comment is currently awaiting admin approval, join now to view.