This tutorial was written by Space Cowboys team member Chris Schweiger, who is 3D Art Lead on Petrograd.
For this tutorial I'm using the following programs.
3ds Max 2009
CryEngine 2
Photoshop 7
NotePad
This tutorial starts off with the assumption that you've already installed Crysis and the Crysis SDK which also includes CryExport plugin for 3ds Max and CryTiff plugin for Photoshop.
Step 1: Setting up your Mod file structure.
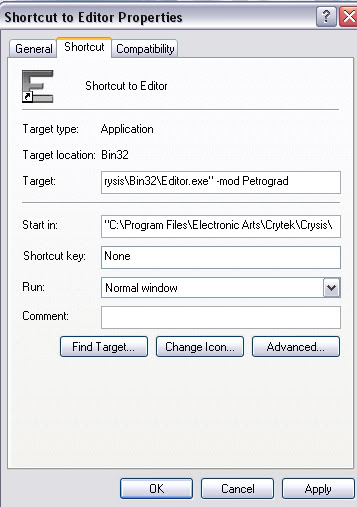
The first thing you should do is right click on you Editor icon on your desktop and click on "Properties" Under Target at the end you'll see Editor.exe". Put a space their at the end and type -mod Petrograd. Like this.
The Second thing you need to do is find out where to put your models. For a mod you need to follow these steps:
1. Locate where Crysis is installed. Once you found where Crysis is you need to find the folder called Mods.
2. Click on the Mods folder and create a sub folder with the name of your mod lets call this one "Petrograd".
3. Double click on "Petrograd" and make a new folder called "Game".
4. Double click on "Game" and make a new folder in that one called "Objects".
5. Double click on "Objects" and make a new folder in that called "Petrograd"
6. In the last folder called "Petrograd" you can place your files, for example mines called "Giant_Trash_Container".
Your file structure should look something like this.

Note: This setup should only house your finished files. Files that are still being worked on should be placed in another location. Why do this? Well for a couple reasons, with the mod structure your material files wont save and secondly your .dds files wont generate automatically so you would have to input them manually. So how do you get around this? Easy just backtrack to the root folder of Crysis and do the following steps.
1. Double click on the Crysis folder. Find the "Game" folder and double click on that. Next find the "Objects" folder and open that folder and place your temporary files their. This should be where you work on your files. Once your done just copy the folder and paste it in your mod structure.
Once your files are placed in your mod structure just make sure your materials paths are correct. You can do this by opening your .mtl file with notepad and looking at your texture maps paths. Make sure that they are following your mod structure i.e. Game\Objects\Petrograd\Giant_Trash_Container and not your temporary folder.
Step 2: Prepping your model for export.
For this tutorial I will be using a personal model called Giant_Trash_Container.

Make sure when you model and unwrap that your material ID's are separated by their type of material. For example on this model I have the material ID 1 set for the metal base and material ID 2 is set for the plastic top. Why do you need to do this? Well, if for example you shot the trash container you want the bullet holes to reflect the material that they hit. It would look weird if you shot the metal base and you saw a wood bullet hole.

Here in editable poly mode I selected all the metal faces and set them to material ID 1.

Then I selected the plastic top and set it to material ID 2.
Now its time to make the textures, for that I use Photoshop. Now people always ask me "what type of texture maps should I make"? You should always make a Diffuse, Specular, and Normal Map. So I go intoPhotoshop and make my 3 different maps for both the metal and the plastic materials. Now its time to save those textures. CryEngine only recognizes 2 different file types .dds and .tiff so you can use either one but I prefer .tiff since its a bit easier to use.
So click File>Save As and name it whatever you'd like. Then click on the format drop down menu and select .tiff and click OK. It should bring up a small screen like this.

Now just click on the Preset drop down menu and select Diffuse_HighQ for the diffuse texture. This will just make sure that the texture retains its highest quality. You can now repeat the same steps for the Specular map and the Normal map, just make sure to change the "Preset" to its corresponding texture.
Now make sure that all of your texture files are in the same folder as your model like this.
Now its time to go into 3ds Max and apply those textures to the model. So open 3ds Max up and tap the M button on your keyboard and that will open up your material editor.
1. First thing to do is change the materials name to the name of your model.
2. Secondly click on the button named Standard and change that to Multi/Sub-Object.

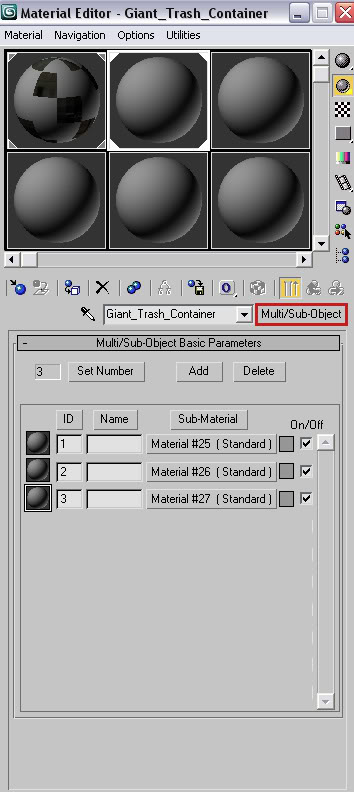
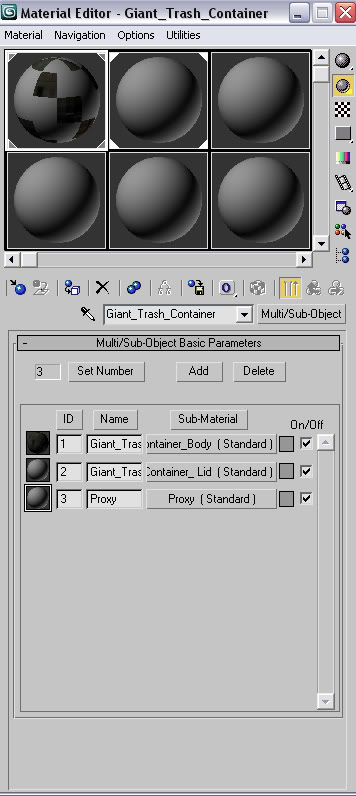
Set the number of material ID's to three. The first two ID's will be set as the metal and plastic while the third ID will be set for the Proxy.It should look something like this.
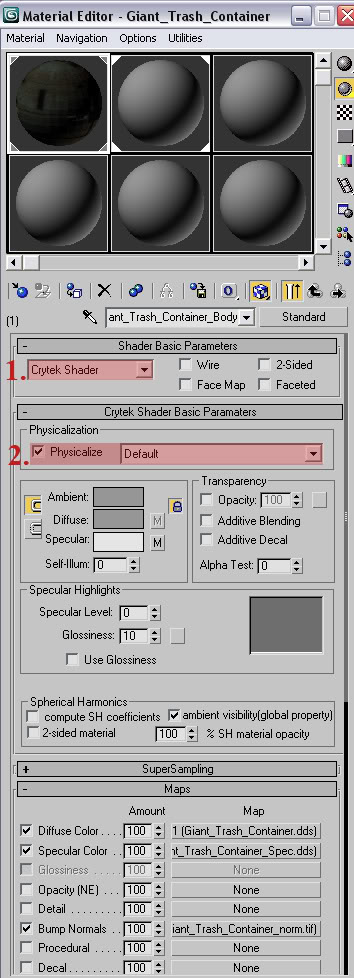
Click on the first sub material and apply these changes.
1. The first one is in the drop down menu and will apply the Crytek shader to your model.
2. While the second one check the box and leave the drop down menu to its default setting.
Then go down to the Maps section and apply your diffuse, specular and normal map to their corresponding slots.
Note: When assigning your normal map make sure you have select "Bitmap" and nothing else like "Normal Bump" if you do your textures will not export over to the CryEngine.
Repeat these steps for material ID 2
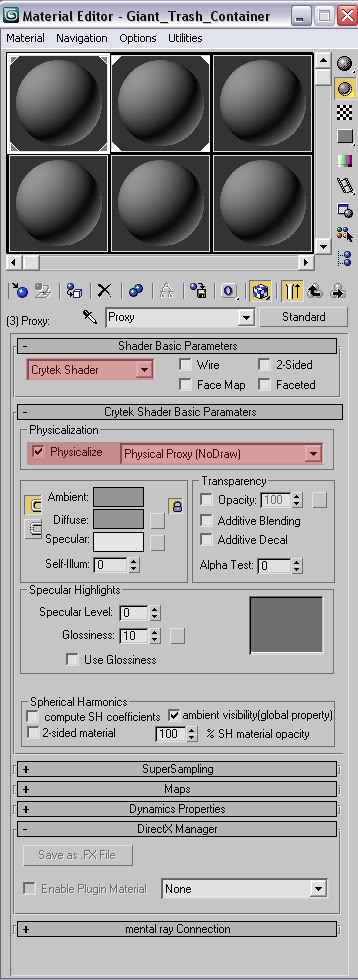
For the Proxy material all you have to do is change shader to "Crytek Shader" and check the box for Physicalize and in the drop down menu select Physical Proxy(No Draw).
Now just apply your material to your model and it should look like this.

Step 3: Creating the Physics Proxy and the Occlusion Proxy
Physics Proxy:
The Physics Proxy is a simple mesh that gives your model physical qualities so you don't accidentally walk through your model.

All you have to do is make a simple mesh that covers your model. Make sure that when your done that it is perfectly aligned over your original model. Don't worry you wont see it when you export it.
1. Select your model named proxy and click on the link button on top.
2. Then click the select by name button. This will bring up the Select Parent window.
3. Click on the name of your main object or parent as they call it and hit the link button.
This will link your proxy model to your main object model.

Occulsion Proxy:
Next is Occulsion proxy. Now the occulsion proxy is a ultra simple mesh that is placed and aligned over your object like the Physics proxy. What this proxy does is prevents objects from being rendered that are not in your field of view.
The setup for this proxy is very simple. All you have to do is make a ultra simple mesh and name it $occulsion. Then just link the occulsion proxy to the main object model like you did on the Physics Proxy.

In the end your setup should look like this. See how the Parent is on top and the two proxy's are underneath and indented showing that they are linked to the parent.

Reset XForm:
Before you export your model into the CryEngine make sure you select your main model
1. Click on the utilities tab.
2. Click the Reset XForm button.
3. Click the Reset Selected button.

1. Click back to the modify stack.
2. Right click over the Reset XForm.
3. Select the collapse all too collapse the XForm into your model.

Now your model is ready to be exported into the CryEngine.
Step 4: Exporting your model into the CryEngine.
Once your ready to export click back on utilities tab and click the "CryENGINE2 Exporter" button. This brings down a menu underneath it. Now scroll down near the bottom till you see the Material section.
1. Click the "Create Material" button. The editor will open up if you don't have it open already.
If the Save As Window doesn't open up just click the "Create Material" button again and it should work.
2. Save the material with the same name as your object. It is very important that its the same name or it will not work.
Then click save.

Now scroll back up near the top and you'll see the "Object Export" Section.
1. Make sure your main object is selected and click the button "Add Selected" and then it will show up in the window right above the buttons.
2. Click the "Export Nodes" button and then your object will be exported over to the CryEngine.

To make sure that your files are where they should be check your object folder and you should see your 3ds Max file, your texture files and a .cgf file and a .MTL file
Now its time to open the editor. It will open up with a blank screen. Just go to File>Open>Levels>Multiplayer>PS and select any level or like me make a custom level.
1. Now with your level loaded click on the "Brush" button and that will open up a browser.
2. Now double click on the "Objects" folder to open that up.
3. Then double click on the folder that you made and their you'll see the folders of your models.
After that just double click on the folder with your model and you'll see a blue node with the name of your model then just highlight the model and drag it into the scene.

Then your scene should have your model in it and look similar to this.

I hope this helps you out a little. If you have any questions or comments feel free to e-mail me at Chris@SpaceCowboysStudio.com


A good detailed tutorial.
Really nice that you help other modders or those who want to be.
Nice article; but you forgot about $LoD, could be added just as example.
Great tutorial from a great team. Keep up the good work guys and thanks for showcasing this tutorial.
Thanks for this tutorial.
Excellent :)